This section will explain how to set up your development environment.
Getting Started
The Material Theme plugin is built using the IntelliJ Plugin DevKit which allows users to develop plugins for the different platforms.
Plugins can be written either in Java, Groovy or Kotlin. You can use any editor to write plugins: Atom, Sublime, Visual Studio Code… though for obvious reasons, it’s preferable to use a JetBrains IDE, so you can debug easier. You can use either IntelliJ IDEA or the free IntelliJ IDEA Community Edition.
Two plugins are necessary to work on a plugin, especially on the Material Theme:
- Plugin DevKit
- Gradle
These plugins are built-in with the IntelliJ IDEA edition, but make sure that you have enabled them.
Plugin DevKit
The Plugin DevKit allows you to run and debug plugins inside instances of the IDE. You can find out more at the online documentation at the IntelliJ SDK Documentation
But the Material Theme plugin is using Gradle, so there is no need to do any of that, just skip to the next section.
Gradle
Gradle is a build system for Java applications, including IntelliJ Plugins thanks to the Gradle IntelliJ Plugin.
It allows developers to run commands, download packages, execute tasks and so on with a simple command interface by using a configuration file.
To get started, first install the Gradle plugin if not available, than activate it and restart the IDE. You will then get prompted with a dialog asking if you want to configure the project as a Gradle project. The IDE will then download the Gradle devkit and wrapper and a new tool window will be available on the right with the tasks available.
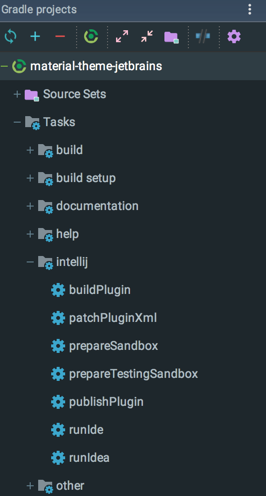
You can run tasks using the CLI by using the gradle wrapper, like this: gradlew <task_name>. Or you can use the
plugin and double-click on a task to run it. The most important task is the runIde task which runs an instance of
the IDE with the plugin prebundled in it.
Once you click on a gradle task, it will be added to the Select/Run Debug Configuration dropdown at the top, allowing
you to run and debug easily.
You can read more about it at the Gradle Intellij Plugin page.
Environment files
Here are the important files necessary for plugin development.
plugin.xml
The plugin.xml file is the core of the plugin. This is a Manifest that describes the plugin and its components, and
is the most important file of any plugin.
It is located inside src/resources/META-INF and should not be moved in any circumstances.
You can read more about plugin.xml here.
build.gradle
The build.gradle file is the Gradle configuration used for making the plugin. It contains the dependencies required by
the project, the different tasks that can be run (such as Tests or CheckStyle) and configuration for the Gradle
JetBrains plugin.
gradle.properties
Last but not least, the gradle.properties file is a list of variables that can be used inside the build.gradle file.
It can be useful to set different values without modifying the build.gradle file, or to use it on different development
environments.
This file should not be commited to the Version Control.
Documentation
To find resources about Plugin Development, first you can check at the official documentation. This will answer all questions regarding how to run the plugin locally.
But this documentation is pretty scarce, it’s just the tip of the iceberg. The best way to learn is to actually look at the source code directly.
You can do that either by looking at the sources from GitHub or UpSource, or you can simply download the sources locally
using Gradle. Simply open the tool window at the right and click on the Refresh Project to import the SDK and the
sources.
You can also check out other plugins made by other developers to find inspiration.